ChatModel, ChatClient, and Prompt Engineering
When you write code that calls an LLM with Spring AI, the first things you meet are ChatModel and ChatClient. Both send questions to a model and receive answers, but they do different jobs. Once you know the difference, you have less code to change when the model provider changes, and it also becomes clear where to attach features such as memory and tools later on.
This article follows the first part of Chapter 2 of the book. It first looks at how Spring AI brings different AI models together behind common interfaces, then sets up a local development environment with Ollama and makes a first call. Next, it compares synchronous calls and streaming with ChatClient, and goes over the message roles that make up a prompt, PromptTemplate, and ChatOptions. Where the previous article surveyed the changes in 2.0, from this article on you follow along by running the examples yourself.
Design principles of the AI Model API
JDBC provides a useful analogy. An application depends only on the JDBC interfaces, and the driver handles the communication that differs from database to database. Spring AI works the same way: it hides providers with different APIs, such as Ollama, OpenAI, Anthropic, and Google Gemini, behind common Java interfaces.
At the top of the hierarchy are two interfaces: Model, which sends a request and waits for the complete response, and StreamingModel, which streams chunks through a Flux as the result is produced. Model types such as ChatModel, ImageModel, and EmbeddingModel are interfaces that extend these two.
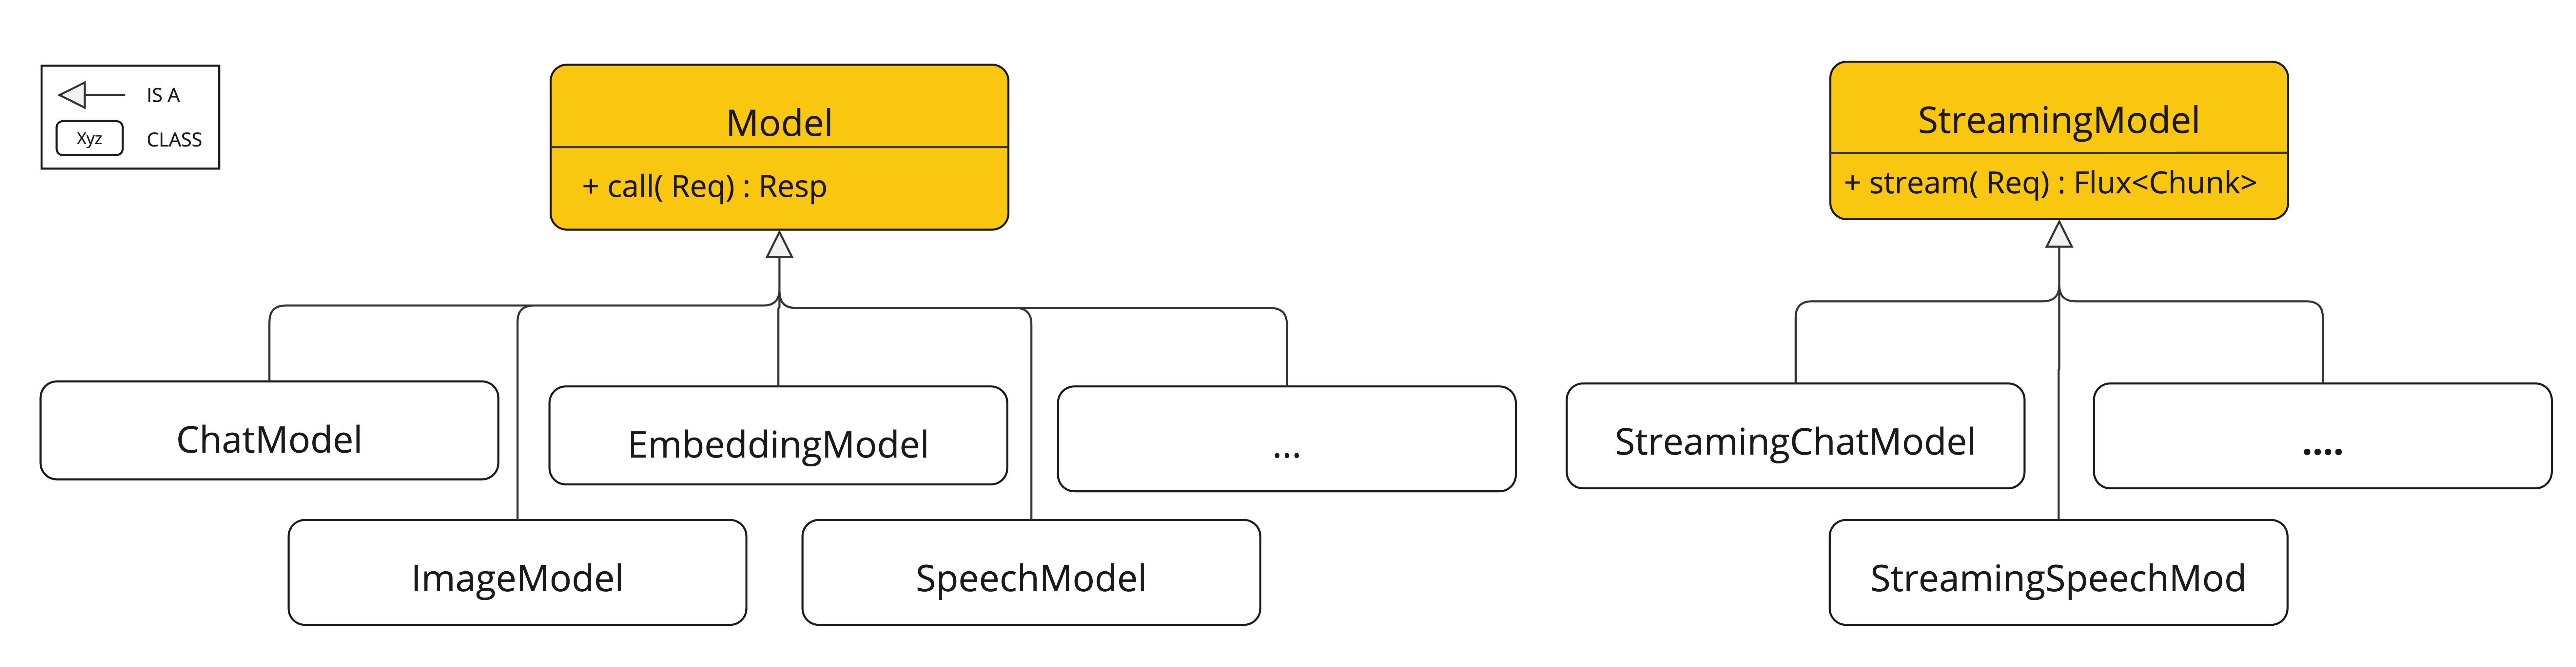
Not every type supports streaming. Image generation and embedding are tasks whose results arrive all at once, so they have only the synchronous interface. Most chat model implementations, on the other hand, implement both interfaces, so you can choose between call() and stream() on the same object. If business code relies only on the ChatModel interface rather than on implementation classes, switching providers means leaving the Java code as it is and changing only the dependencies and configuration.
A local-first development environment
The book recommends a local-first strategy. During development, you experiment with free models running on your own PC without worrying about cost, and ahead of production deployment, you weigh performance and environment and move to a cloud API such as OpenAI. The model server is Ollama, and the reference model is Alibaba's Qwen3.5-4B (qwen3.5:4b). It is lightweight yet handles Korean well, and it supports tool calling and image input. Ollama is installed directly on the host OS rather than in Docker, so that GPU acceleration (CUDA, Metal) is available right away without separate driver setup. If your PC's specs fall short, see the appendix article and do the exercises with the OpenAI API.
A Spring AI project is a Spring Boot project with AI dependencies added. All you need to do is create a Boot project as usual, align versions with spring-ai-bom, and add the Ollama starter. The example's pom.xml targets Java 21, Spring Boot 4.0.7, and Spring AI 2.0.0. The configuration is written in application.yml, which makes it easy to add comments in Korean.
logging:
  level:
    org.springframework.ai.chat.client.advisor: DEBUG # 어드바이저 동작 확인용(Step5 / final)
spring:
  ai:
    # 실행할 Step 선택 - 2장: ch2-step1 ~ ch2-step5 / ch2-final
    cli:
      step: ch2-final
    model:
      chat: ollama
    ollama:
      base-url: http://localhost:11434
      chat:
        think: false         # 추론 비활성
        model: qwen3.5:4b
spring.ai.model.chat selects the chat model provider to use, and under spring.ai.ollama you write the Ollama server address and the model name. think: false turns reasoning off. Qwen3.5-4B supports reasoning, so if you leave this value empty, reasoning may turn on depending on the environment and responses can slow down. spring.ai.cli.step is a value defined by the example project that picks which one of the step-by-step runners to run. The logging.level setting at the top turns on the DEBUG level so you can see the requests and responses that the logging advisor records in Step 5 and the final step.
First call: one question, one answer
basic-chat is the smallest example in the repository, and it uses the same Ollama configuration. There is no controller: a single CommandLineRunner bean sends a question right after the application starts and prints the answer to the console.
@SpringBootApplication
public class SpringAiAgentBookApplication {

    public static void main(String[] args) {
        SpringApplication.run(SpringAiAgentBookApplication.class, args);
    }

    /**
     * 애플리케이션 시작 시 자동으로 실행되는 Runner 빈 등록
     * ChatClient.Builder는 스프링 AI가 자동으로 주입
     */
    @Bean
    public CommandLineRunner chatRunner(ChatClient.Builder chatClientBuilder) {
        return args -> {
            // 1. 질문 준비 (userPrompt 값을 바꿔 실행해 보세요!)
            String userPrompt = "안녕 Spring AI!";
            System.out.println(">>> AI에게 질문: " + userPrompt);

            // 2. AI에게 질문 전송 및 응답 수신
            String response = chatClientBuilder.build()
                    .prompt()
                    .user(userPrompt)
                    .call()
                    .content();

            // 3. 최종 답변 출력
            System.out.println(">>> AI 답변: " + response);
        };
    }
}
When you add the starter, auto-configuration registers a ChatClient.Builder bean connected to the ChatModel that matches your configuration. The code builds a client with this builder, starts a request with prompt(), and puts the question in user(). call() is a synchronous call that waits until the model has generated the whole answer and then receives it all at once, and content() extracts only the text from that response. The longer the answer, the longer you wait before you see the first character.
ChatModel and ChatClient: the driver and the client
Spring AI splits the API for talking to models into two layers. ChatModel, the low-level API in the lower layer, plays a role similar to RestTemplate or a JDBC driver. It converts a request into the provider's API format, sends it, and interprets the response that comes back. In short, it is responsible for "how to communicate." call(Prompt) returns a ChatResponse, and stream(Prompt) returns a Flux<ChatResponse>. A ChatResponse contains a list of generated answers (Generation) and metadata such as token usage.
ChatClient, by contrast, is a high-level API built on top of ChatModel. Its concern is "what to talk about." It assembles requests with a builder and a fluent API, and it handles prompt templates and the flow of the conversation. Unless you are extending the framework or building a model implementation yourself, it helps to write application code with ChatClient.
In ChatClient, assembling a request (prompt(), system(), user()) and executing it (call(), stream()) are separate steps. So changing only the final execution method turns a synchronous call into streaming. Step1 of chapter2 switches the basic-chat call to streaming and wraps it in a loop so that you can ask questions and get answers repeatedly.
@Component
@ConditionalOnProperty(prefix = "spring.ai.cli", name = "step", havingValue = "ch2-step1")
class Ch2Step1_BasicStreamChat implements CommandLineRunner {

    private final ChatClient chatClient;

    Ch2Step1_BasicStreamChat(ChatClient.Builder builder) {
        // 빌더를 이용해 불변 클라이언트 생성
        this.chatClient = builder.build();
    }

    @Override
    public void run(String... args) {
        System.out.println("=== [Ch2] Step1: 기본 스트림 채팅 (ChatClient, stream) ===");
        System.out.println("종료하려면 /exit 입력\n");

        try (Scanner scanner = new Scanner(System.in)) {
            while (true) {
                System.out.print("> ");
                String input = scanner.nextLine();
                if ("/exit".equalsIgnoreCase(input.trim())) break;

                System.out.print("AI: ");
                chatClient.prompt()
                        .user(input)
                        // 스트리밍 응답 활성화
                        .stream()
                        // 문자열 토큰 스트림으로 변환
                        .content()
                        // 토큰이 도착하는 즉시 터미널에 출력
                        .doOnNext(System.out::print)
                        // 리액터 비동기 흐름을 CLI 동기 진행 순서에 맞춤
                        .blockLast();
                System.out.println("\n");
            }
        }
    }
}
stream().content() returns a Flux<String>, and doOnNext prints tokens as they arrive. blockLast() is console-specific handling that waits for the response to finish before accepting the next input. Users start reading the answer from the first token, so the perceived wait time goes down. In exchange, both the frontend and the backend need code that handles streams. You turn this runner on with the command-line argument --spring.ai.cli.step=ch2-step1.
There is also a reason the client is created only once, in the constructor. ChatClient is an immutable object whose settings cannot change after it is built, so it is safe for multiple threads to share. Settings are added on the Builder, which is mutable. Rather than reusing a single global client, the book recommends injecting a Builder into each component, configuring it for its purpose, and creating a dedicated client with build(). ChatClient does not remember previous conversations either. Chat Memory and the Advisor Chain covers how to carry the conversation context forward.
Prompt and message roles
The Prompt that ChatModel receives is not a string but an object that holds an entire request. It contains the list of messages that make up the conversation (List<Message>) together with the model options (ChatOptions). As a result, you can send a multi-turn conversation in a single request, and it is easy to test the same prompt with only the settings changed.
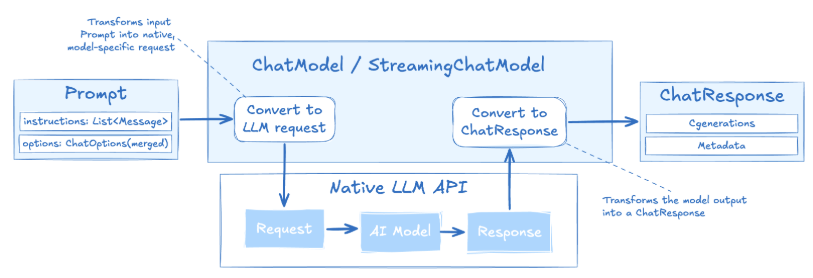
As the figure shows, inside ChatModel the Prompt is converted into a provider-specific request, and the model's response comes back converted into a standard ChatResponse.
Messages carry roles because the LLM needs to know who said each input. Spring AI defines Message by adding a role (MessageType) to the Content interface, which holds text and metadata, and it provides an implementation for each role.
SystemMessage: Sets the model's persona and the rules of the conversation. It holds text only.UserMessage: The user's input. Along with text, it can carry media such as images or audio.AssistantMessage: The model's answer. When the model asks to use a tool, the tool call information is also stored here.ToolResponseMessage: Used to return the result of running a tool to the model.
To attach a system message to every call a client makes, use the Builder's defaultSystem(). Step2 uses this method to fix the persona of a senior Java mentor.
    private static final String SYSTEM_PROMPT = """
            당신은 시니어 자바 개발자이자 기술 멘토입니다.
            - 코드 예제는 Java 21 이상의 최신 문법을 활용합니다.
            - 답변은 단계적이고 근거를 함께 설명합니다.
            - 확실하지 않은 내용은 "모른다"고 솔직하게 답합니다.
            """;

    private final ChatClient chatClient;

    Ch2Step2_PromptTemplate(ChatClient.Builder builder) {
        this.chatClient = builder
                .defaultSystem(SYSTEM_PROMPT)                 // 이 클라이언트 모든 호출에 자동 부착
                .build();
    }
The persona and answer rules are written in a text block and registered in the constructor. The code that sends requests is exactly the same as in Step1, but the answers now come back with the mentor's perspective and tone. To give different instructions for a specific request only, use prompt().system(...).
PromptTemplate: separating structure from data
Prompts used in a service contain values that change every time, such as user input, lookup results, and the current time. Concatenating these values with + makes the prompt hard to read and also vulnerable to prompt injection. PromptTemplate separates the structure of a prompt from its data. Separating the two makes prompts easier to manage, but substitution by itself does not prevent injection, so you still need input validation. You put placeholders such as {topic} in the template and pass the values in a Map at execution time.
Substitution is handled by the TemplateRenderer interface, and the default implementation is StTemplateRenderer, which uses the StringTemplate engine. You get the rendered result in one of three forms, depending on how you use it.
render(): Returns a string. Use it to check the finished prompt in the logs before calling the model.createMessage(): Returns a Message. By default it is a user message, and withSystemPromptTemplateit becomes a system message. It suits cases where you manage system and user templates separately and then combine them into a single Prompt.create(): Returns a Prompt that is ready to call. You can also pass ChatOptions along with it.
With ChatClient, you do the same binding inside the request, in the form user(u -> u.text(...).param(...)).
ChatOptions: model options
Even with the same prompt, the answer changes depending on the options you run the model with. ChatOptions is a common options interface that is not tied to any particular provider, and it holds values such as model, temperature, maxTokens, topP, and topK. Options that only a given provider has are added by dedicated classes such as OpenAiChatOptions and OllamaChatOptions.
The main options are temperature and maxTokens. temperature sets how random the answers are. When consistency matters, as in fact-checking or classification, lower it to around 0.0 to 0.3, and when you need varied answers, as in brainstorming, raise it to 0.8 to 1.0. maxTokens is the upper limit on the number of tokens to generate, so you use it to cut down verbose answers and save cost.
Options are set at two points. When the application starts, the values written in application.yml become the model's default options, and at request time, the values passed through the Prompt or ChatClient's .options() override those defaults. That is why the figure above shows the Prompt's options in a merged state. Dedicated option classes tie your code to a specific provider, so it helps to use them only when the common options cannot do the job.
Where this fits in the 4-tier architecture
The two APIs covered in this article sit in different tiers of the 4-tier architecture. ChatModel and the Ollama model running behind it belong to T4 Foundation, which supplies reasoning. ChatClient, which assembles prompts and options and calls the model, is the starting point of T2 Orchestration. Anthropic presents the augmented LLM, an LLM enhanced with retrieval, tools, and memory, as the basic building block of effective AI systems. ChatClient is designed so that you can attach these elements: .entity() adds structured output, .advisors() adds memory and RAG, and .tools() adds tool calling and MCP. The next article, Tokens and Structured Output: Getting Model Answers as Java Objects, looks at tokens, the unit for estimating cost and context, and then adds structured output.
More in the book
Book sections 2.1-2.4
- Development environment details: recommended hardware specs and alternative models, and creating a project in IntelliJ IDEA
- ChatResponse metadata: finish reasons, multiple answer candidates from OpenAI, and things to watch for when checking token usage
- Configuring ChatClient: auto-configuration and manual injection, and multi-model setups that use several models together
- Advanced template techniques: a renderer that changes the delimiters so they do not clash with JSON braces, and managing templates in external files
- Writing effective prompts: the four elements of instruction, external context, user input, and output indicator, plus few-shot examples
- Model-specific options and prompting techniques: parameter restrictions on reasoning models, and nine techniques from zero-shot prompting to tree of thoughts
References
- Spring AI API: AI Model API: the model abstraction built around Model and StreamingModel
- Chat Model API: the structure of ChatModel, Prompt, Message, and ChatOptions
- Prompt Engineering Techniques: the collection of prompting techniques in the Spring AI documentation
- Building effective agents: the augmented LLM and patterns for building agents
- Download Ollama: Ollama installers
- StringTemplate: the template engine used by PromptTemplate's default renderer