Implementing Tools and Controlling Execution: From @Tool to ToolCallingManager
The previous article looked at the flow in which the model reads tool definitions and requests a call, and the application runs the tool and returns the result. It also looked at ToolCallback, ToolCallingManager, and ToolCallbackResolver, which divide up the work in that flow. This article continues with two questions: how do you build tools in code and hand them to the model, and who controls the repeated cycle of running tools and calling the model again?
Spring has long offered both Spring Data JPA and JdbcTemplate for data access, and both @RestController and RouterFunction for the web layer, leaving developers to pick whichever suited their project. Tool implementation in Spring AI works the same way. There is a declarative approach that puts @Tool on methods, a programmatic approach that assembles tools with a builder, and an approach that uses Java functional interfaces. Whichever you choose, they all end up as a ToolCallback inside the framework.
Methods as tools: @Tool and MethodToolCallback
The simplest way is to put @Tool on a method. If you omit name, the method name becomes the tool name, and if you also omit description, the method name is used as the description. For the model to pick tools correctly, though, it is safer to specify both. Names must be unique among the tools included in the same request. @Tool also has a returnDirect attribute, which sets whether the result is returned directly, and a resultConverter attribute, which specifies the result converter. You can put @Tool on a method regardless of its access modifier or whether it is static, and you can declare several of them in one class.
    @Tool(
            name = ToolNames.CALCULATE,
            description = "두 숫자에 대해 add, subtract, multiply, divide 중 하나의 연산을 수행합니다.")
    public String calculate(
            @ToolParam(description = "연산 이름. add, subtract, multiply, divide 중 하나")
            String operation,
            @ToolParam(description = "첫 번째 숫자")
            BigDecimal left,
            @ToolParam(description = "두 번째 숫자")
            BigDecimal right) {
        return switch (operation.toLowerCase()) {
            case "add" -> format(left.add(right));
            case "subtract" -> format(left.subtract(right));
            case "multiply" -> format(left.multiply(right));
            case "divide" -> {
                if (BigDecimal.ZERO.compareTo(right) == 0) {
                    yield "0으로 나눌 수 없습니다.";
                }
                yield format(left.divide(right, 4, RoundingMode.HALF_UP));
            }
            default -> "지원하지 않는 연산입니다. add, subtract, multiply, divide 중 하나를 사용하세요.";
        };
    }
Method parameters become the tool's input parameters, and the framework generates a JSON schema from them. @ToolParam has no name attribute, so the schema keys are the Java parameter names operation, left, and right. These names remain in the compiled class because Spring Boot compiles with the -parameters option turned on. If you need different keys, rename the parameters, or wrap the input in a record and put Jackson's @JsonProperty on its fields.
Putting @Tool on a method does not make Spring collect it and register it globally. Spring AI is designed this way on purpose. A tool is an execution permission that lets the model call internal APIs and work with databases, so if tools were registered globally and automatically, the model could call features you did not intend it to call. Also, the tools needed vary with the purpose of the conversation and the user's permissions, and exposing every tool all the time only adds options and raises the risk of a wrong choice. So developers decide in their registration code which tools to expose in which context.
To assemble a tool in code instead of with an annotation, pass the definition, the Method to run, and the target object to the MethodToolCallback builder. ToolDefinitionExamples in the previous article takes this approach. You use it when the description and metadata need to change at runtime based on permissions or conditions. If you do not provide a schema, the framework generates one from the method parameters, taking into account any @ToolParam and @Nullable on those parameters. Method tools do not, however, support Optional, asynchronous and reactive types, or functional interface parameters.
If you build a GraalVM native image, you also need to take care of reflection. Spring AI automatically generates reflection hints only for @Tool classes registered as beans, so using an object of a class that is not registered as a bean as a tool causes a runtime error. In that case, declare @RegisterReflection(memberCategories = MemberCategory.INVOKE_DECLARED_METHODS) on that class.
Functions as tools: FunctionToolCallback
Function, Supplier, Consumer, and BiFunction from java.util.function can also become tools. Wrap the function object with the FunctionToolCallback builder and, if needed, register the resulting ToolCallback as a bean.
    public static ToolCallback discountCalculator() {
        Function<DiscountRequest, String> discountFunction = request -> {
            BigDecimal price = request.price();
            BigDecimal discountRate = request.ratePercent()
                    .divide(BigDecimal.valueOf(100), 4, RoundingMode.HALF_UP);
            BigDecimal discount = price.multiply(discountRate).setScale(0, RoundingMode.HALF_UP);
            BigDecimal finalPrice = price.subtract(discount);

            NumberFormat numberFormat = NumberFormat.getNumberInstance(Locale.KOREA);
            return "정가 %s원에서 %s%% 할인되어 최종 금액은 %s원입니다."
                    .formatted(
                            numberFormat.format(price),
                            request.ratePercent().stripTrailingZeros().toPlainString(),
                            numberFormat.format(finalPrice));
        };

        return FunctionToolCallback
                .builder(ToolNames.DISCOUNT_CALCULATOR, discountFunction)
                .description("정가와 할인율을 받아 할인 후 금액을 계산합니다.")
                .inputType(DiscountRequest.class)
                .build();
    }
The builder's first argument is the tool name exposed to the model, and the second is the function to run. The input schema is generated from the DiscountRequest record passed to inputType, and the JSON the model sends is converted into this record before it reaches the function. The unit test Chapter4ToolTests passes {"price": 35000, "ratePercent": 18} directly to call() and checks that the result contains 28,700 won. The Step 2 runner, Ch4Step2_FunctionTools, registers this tool and the customer contact lookup tool with defaultTools().
Because the result is serialized to JSON and sent to the model, a function's input and output must be either Void or POJOs that Jackson can serialize, and the functions and types must be public. Primitive types such as int and collections such as List and Map cannot be used on their own and must be placed inside a POJO. If you need to pass primitives or collections as they are, use the @Tool approach.
Choosing an implementation approach and passing tools to the model
The three approaches suit different uses. @Tool groups related methods into one class for high cohesion, and it works well for exposing an existing service layer as tools with hardly any changes. MethodToolCallback fits when you wrap methods from an external library or change descriptions based on permissions, and FunctionToolCallback fits when you turn a small piece of container-independent logic into a tool on the spot. As tools multiply, two approaches are mainly used: grouping them with @Tool, and exposing ToolCallbacks as @Beans so they can be injected as dependencies. With the latter, tool names are strings and typos cannot be caught at compile time, so the names are collected as constants. support/ToolNames in the example repository plays that role, and the name of @Tool and the function tool builder use the same constants. In short, @Tool fits when you expose existing code grouped by object, and FunctionToolCallback with naming conventions fits when you build new tools with many dependencies as modules.
You usually pass the tools you build to ChatClient. The builder's defaultTools() takes the default tools used for every request, and tools() after prompt() takes tools used only for that request. Both accept @Tool objects and ToolCallbacks alike as varargs.
        this.chatClient = builder.clone()
                .defaultSystem("""
                        당신은 툴 실행 과정을 투명하게 보여 주는 AI 어시스턴트입니다.
                        필요한 경우 날짜, 계산, 할인, 고객 연락처, 할 일, 상품 재고 툴을 사용합니다.
                        """)
                .defaultTools(dateTimeTools, calculatorTools, todoTools, inventoryTools)
                .defaultTools(
                        Chapter4ToolCallbacks.discountCalculator(),
                        Chapter4ToolCallbacks.customerContactLookup(),
                        Chapter4ToolCallbacks.sessionSummary(false)
                )
                .defaultAdvisors(
                        ToolCallingAdvisor.builder().build(),
                        new SimpleLoggerAdvisor()
                )
                .build();
The Step 5 runner registers four @Tool beans and three function tools together through two defaultTools() calls. However they are implemented, to the model they are all tools it can call. Tools passed with tools() on a request do not replace the default tools but are appended after them, and if names collide, an IllegalStateException is thrown. If a particular request needs to leave out some of the default tools, create a separate client whose configuration is copied with mutate().
When you use the lower-level ChatModel directly, there are no such methods, so you have to put ToolCallbacks in the options object and convert @Tool objects with ToolCallbacks.from(). Another difference is that request options are not merged with the default options but replace them entirely, so unless you need special control, it is safer to use ChatClient.
The ToolCallingManager API and its internals
Whichever control approach you use, ToolCallingManager handles the lifecycle of tool execution. Of the two methods on the interface, resolveToolDefinitions() extracts the list of ToolDefinitions to send to the model from the tools in the request options. executeToolCalls() takes the original Prompt and the ChatResponse containing the tool calls, runs the tools, and returns a ToolExecutionResult.
The result's conversationHistory() holds the conversation history, in which the user request, the model's tool call message, and the tool result message follow one another. Normally you call the model again with this history, but if every tool that was called uses return direct, the result is returned without calling the model again. Parallel tool calling, where a single response carries multiple tool calls, is a model-side feature. The default implementation, DefaultToolCallingManager, runs the list of tool calls one at a time in a for loop rather than on multiple threads.
DefaultToolCallingManager is registered as a bean through auto-configuration. To change its behavior, define your own bean built with ToolCallingManager.builder(). Internally, the default implementation uses three collaborators. ObservationRegistry records tool execution time and whether the execution succeeded. Unless you configure it, it is a NOOP that records nothing, and if the Actuator dependency is present, the manager receives the auto-configured registry. ToolCallbackResolver finds a ToolCallback by the name the model sent. In the default configuration, DelegatingToolCallbackResolver delegates resolution to its internal resolvers, and among them, StaticToolCallbackResolver looks up the name in the list of ToolCallback beans collected at startup. Finally, ToolExecutionExceptionProcessor either turns a ToolExecutionException thrown by a tool into a string to send to the model or throws it to the caller. The default implementation, DefaultToolExecutionExceptionProcessor, turns RuntimeException types into messages for the model, and passes checked exceptions and Error types straight to the caller. If you want to receive every tool error as a Java exception, set spring.ai.tools.throw-exception-on-error to true.
    public ManualToolCallingService(
            ChatModel chatModel,
            DateTimeTools dateTimeTools,
            CalculatorTools calculatorTools,
            InventoryTools inventoryTools) {
        this.chatModel = chatModel;
        this.toolCallbacks = ToolCallbacks.from(dateTimeTools, calculatorTools, inventoryTools);
        this.toolCallingManager = ToolCallingManager.builder()
                .toolCallbackResolver(new StaticToolCallbackResolver(List.of(this.toolCallbacks)))
                .toolExecutionExceptionProcessor(new FriendlyToolExceptionProcessor())
                .build();
    }

    public String ask(String question) {
        // ChatModel 직접 호출은 툴을 자동 실행하지 않으므로, 옵션에는 툴 목록만 담음
        var options = OllamaChatOptions.builder()
                .toolCallbacks(this.toolCallbacks)
                .temperature(0.1)
                .build();

        Prompt prompt = new Prompt(List.of(SYSTEM_MESSAGE, new UserMessage(question)), options);
        ChatResponse response = chatModel.call(prompt);

        for (int loop = 0; loop < MAX_TOOL_LOOPS && response.hasToolCalls(); loop++) {
            // 수동 실행
            ToolExecutionResult toolExecutionResult = toolCallingManager.executeToolCalls(prompt, response);
            // 직접 반환 처리
            if (toolExecutionResult.returnDirect()) {
                return ToolExecutionResult.buildGenerations(toolExecutionResult).getFirst().getOutput().getText();
            }

            // 대화 이력을 더해 모델 재호출
            List<Message> conversationHistory = toolExecutionResult.conversationHistory();
            prompt = new Prompt(conversationHistory, options);
            response = chatModel.call(prompt);
        }

        return response.getResult().getOutput().getText();
    }
The constructor builds the manager itself with the builder. It puts the tool array converted with ToolCallbacks.from() into StaticToolCallbackResolver, and passes toolExecutionExceptionProcessor() a FriendlyToolExceptionProcessor, which turns exceptions into a notice saying "a problem occurred while running the tool." ask() calls ChatModel directly, so it puts the tools in OllamaChatOptions, and the loop in this method is the user-controlled approach covered in the next section.
Framework-controlled, advisor-controlled, and user-controlled execution
There are three execution approaches, depending on who controls the cycle of receiving the model's tool call request, running the tool, and calling the model again.
Framework-controlled execution
This is the approach you get without any extra configuration. When tools are registered with ChatClient, ToolCallingAdvisor joins the advisor chain automatically, and the cycle completes within the single call() the developer makes.
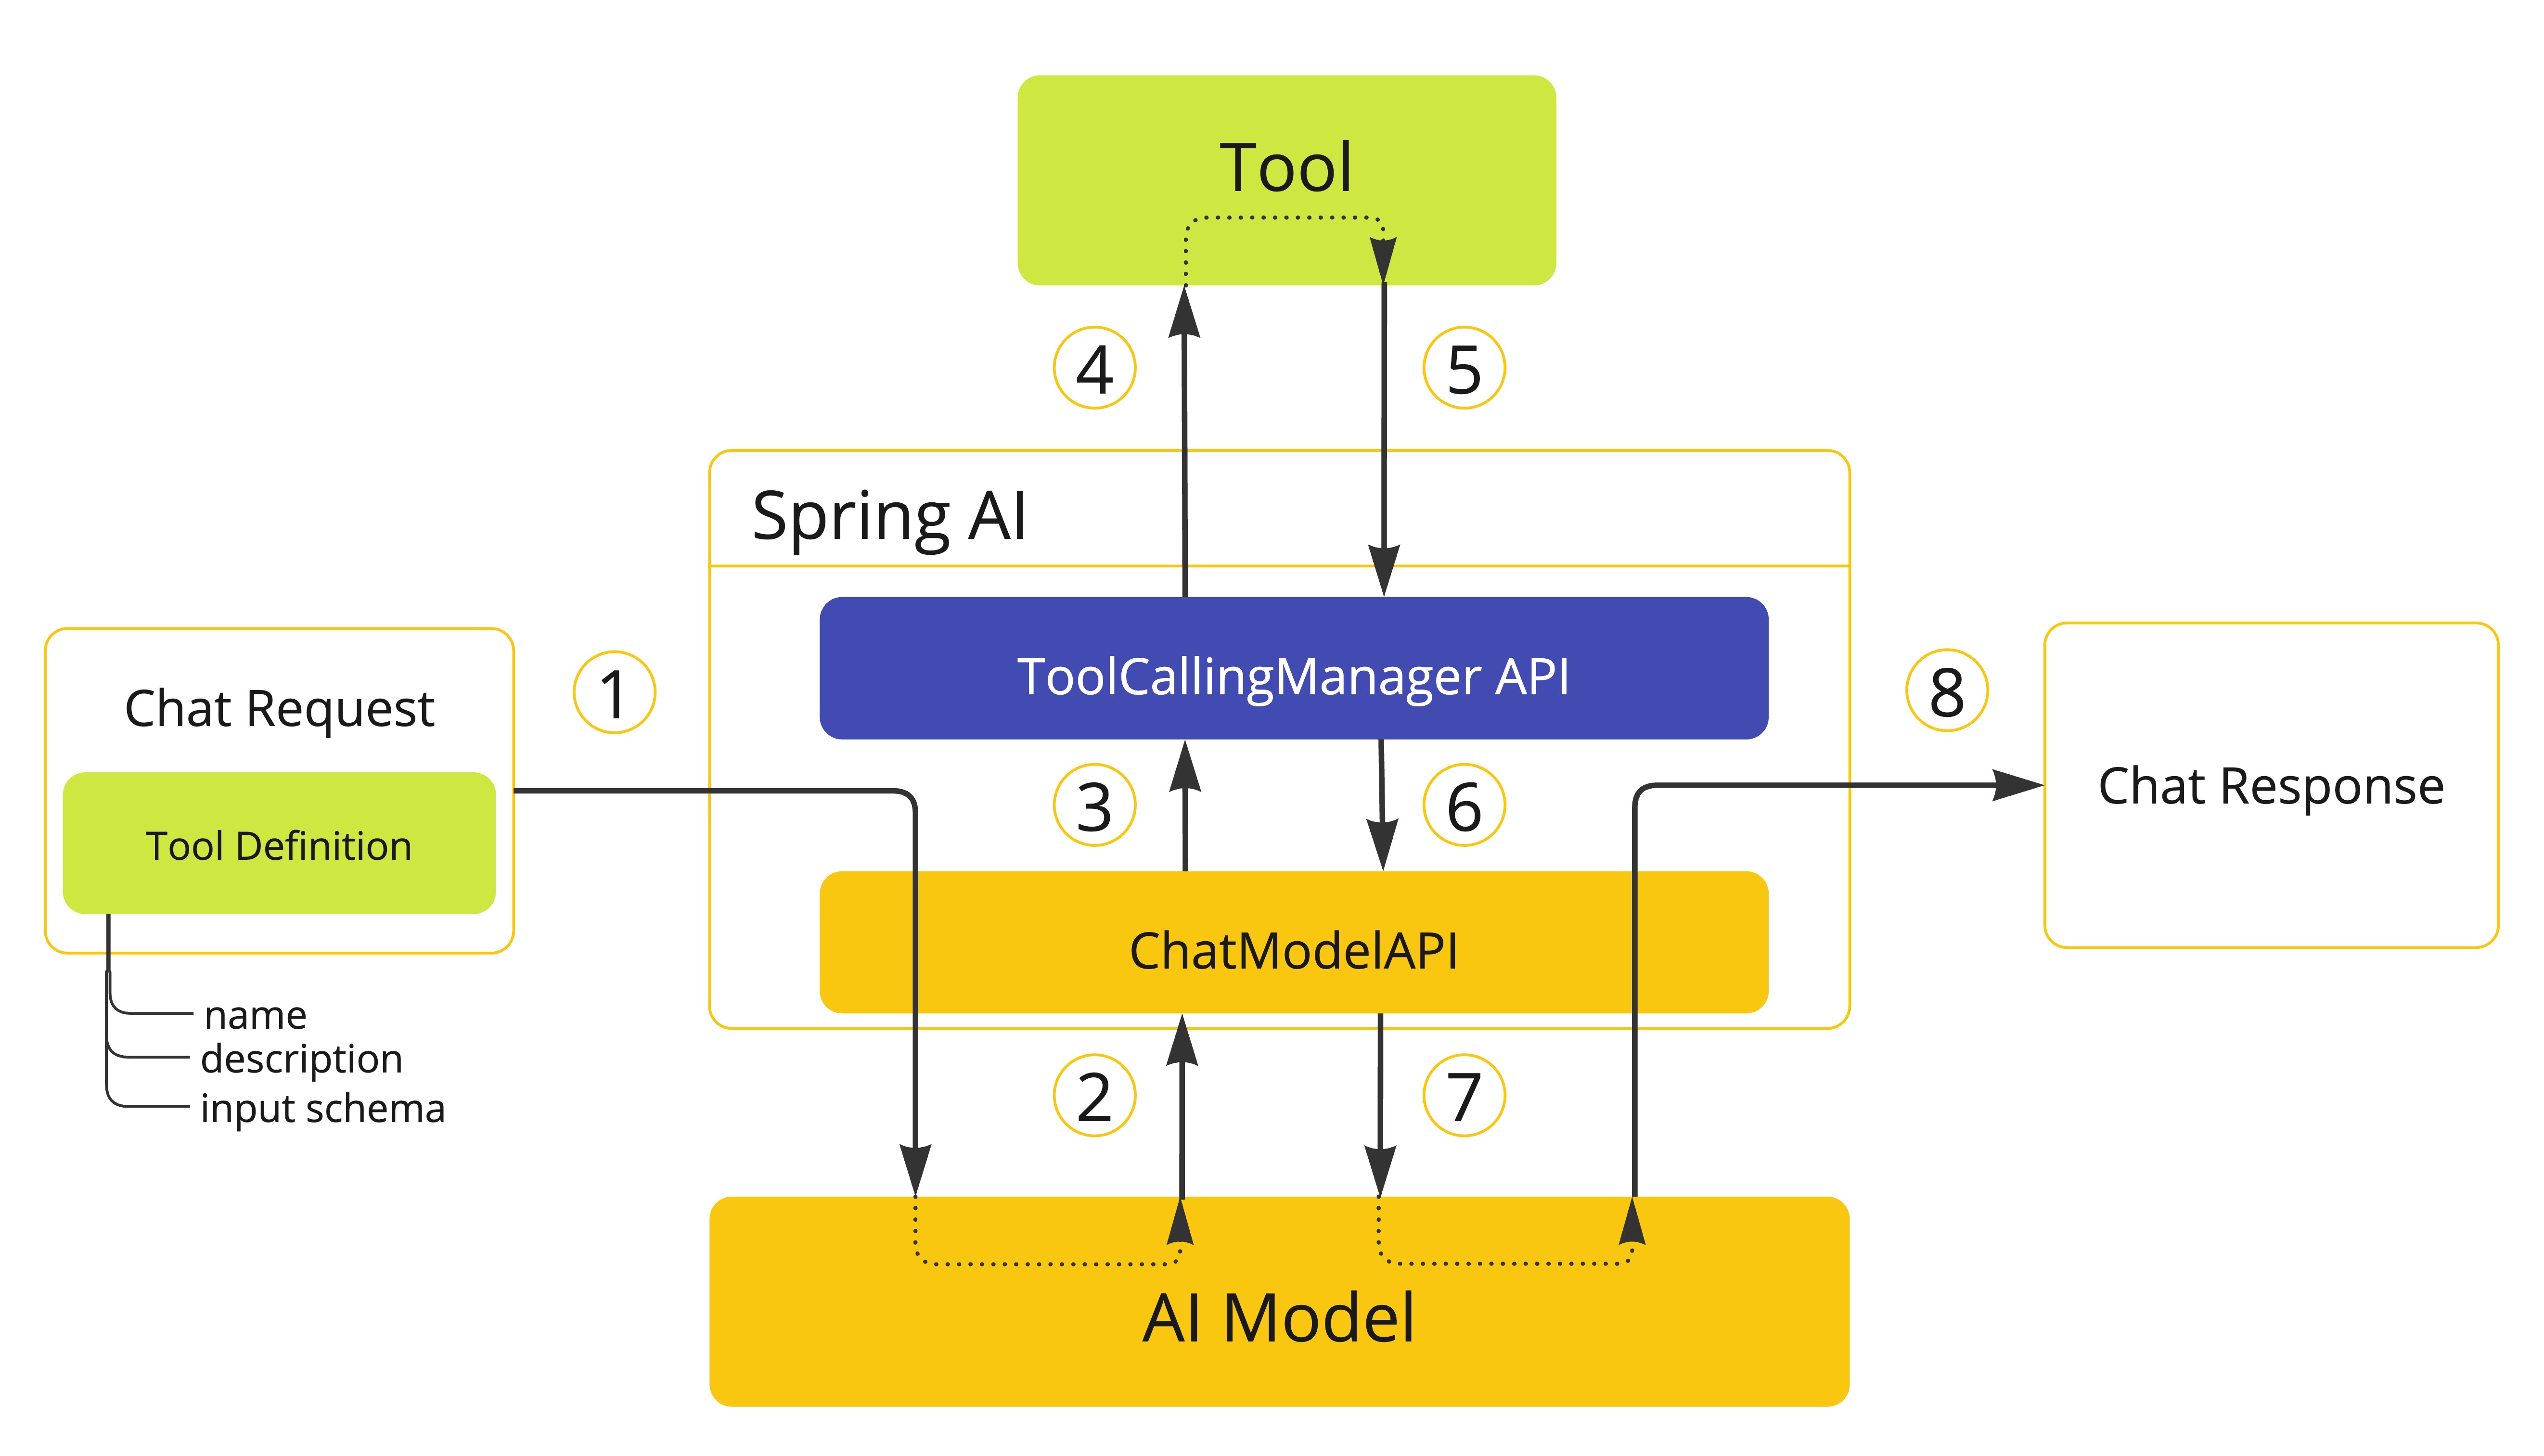
The request is sent with tool definitions (1), and when the model responds with a tool call (2), ToolCallingAdvisor in the chain intercepts the response and hands it to ToolCallingManager (3). The manager runs the tool and gets the result (4, 5), then returns it to the advisor (6). The advisor adds the result to the prompt as a tool response message and calls the model again (7). The model's final answer comes back as the response (8). Where the figure shows the ChatModel API calling the manager, the book describes that step as ToolCallingAdvisor in the ChatClient chain intercepting the response. To turn off automatic registration, pass .advisors(AdvisorParams.toolCallingAdvisorAutoRegister(false)) for a single request, or set spring.ai.chat.client.tool-calling.enabled=false for the whole application.
Advisor-controlled execution
If you need fine-grained control over the loop's behavior, configure ToolCallingAdvisor yourself and add it to the chain. Early versions of Spring AI found tools and ran them recursively inside the ChatModel implementation. As a result, an object that should only have handled communication with the model grew heavy, and because the loop was hidden inside the model, there was no way to log the intermediate steps or keep them in memory. Connecting many external tools dynamically, as MCP does, required moving tool control out of the model. Once control moves to the advisor chain, tool call messages pass through the chain, which makes logging and monitoring easier, and it also becomes easier to connect the conversation history during the loop to memory or to plug in retry logic. The Step 5 runner shown earlier also adds ToolCallingAdvisor directly to defaultAdvisors(), alongside SimpleLoggerAdvisor.
With the builder, you set the manager to use (toolCallingManager()) and the position in the chain (advisorOrder()). With toolExecutionEligibilityChecker(), you can change the condition that decides whether to run another iteration and so add a guard against infinite loops, and with disableInternalConversationHistory(), you can turn off the conversation history that the advisor keeps on its own. Position matters because the order value decides what runs inside and outside the loop. The smaller the value, the closer an advisor is to the client and the earlier it receives the request, and advisors with a larger value than ToolCallingAdvisor are copied into the downstream chain and run on every iteration inside the loop.
The book's advisor-controlled example places ToolCallingAdvisor at HIGHEST_PRECEDENCE + 300 and the memory advisor at + 400, so that memory records even the intermediate steps inside the loop, and it calls disableInternalConversationHistory() so the history is not added twice. The final project's ToolEnabledChatService does the opposite and places the memory advisor at + 200 and ToolCallingAdvisor at + 300. Memory stays outside the loop, loading the previous conversation once per request and saving only the user message and the final answer, while the advisor manages the history during the loop with its default settings. Advisor ordering is covered in more depth in Recursive Advisors and Tool Loop Control in Chapter 6.
User-controlled execution
For human-in-the-loop (HITL) cases that require user approval before a tool runs, or for business flows that are hard to express as a chain, you take out the automatic handling and have your code run the loop itself. The ask() method shown earlier is an example. ChatModel.call() does not run tools automatically, so the code checks hasToolCalls() on the response, runs the tools with executeToolCalls(), builds a new Prompt from the conversation history in the result, and calls the model again. If a tool uses return direct, the code returns the tool result on the spot, and MAX_TOOL_LOOPS limits the loop to three iterations. The Step 4 runner, Ch4Step4_ToolCallingManager, runs this service as a CLI.
Because execution still goes through the manager, you can keep using tool resolution and exception handling as they are. But as tools multiply and nested calls, retries after partial failures, permission checks, and audit logging are added, a single loop quickly becomes complex, and your code ends up taking on flow control and memory synchronization as well. That is why the book recommends advisor-controlled execution except in special cases.
Where this fits in the 4-tier architecture
@Tool methods and FunctionToolCallback are ways to build the parts of the T3 Capability tier, while who controls the tool loop, and how, is a question for T2 Orchestration. The setup that brings the tool loop into the advisor chain with ToolCallingAdvisor is used again in Chapter 6 to build an AI agent system. All the tools so far have lived inside the same application. The next article, MCP Basics and the Spring AI MCP Client, covers how to connect tools outside the application through a standard protocol.
Hands-on project for this chapter
4.5 Tool-Enabled AI Chatbot CLI Project
You build a CLI for a small hypothetical business-support chatbot that handles customer inquiries, bundling date, calculation, discount, customer contact, product stock, and to-do tools into a single ChatClient. It registers method tools and function tools together and combines chat memory with ToolCallingAdvisor to handle requests such as "Reserve 2 units of SKU-100 stock and add that as a to-do" with streaming responses. For the full run-through, follow the README (in Korean) in chapter4/ of the example repository.
More in the book
Book sections 4.3-4.4
- Attribute tables for
@Tooland@ToolParam, and tables of the settings for theMethodToolCallbackandFunctionToolCallbackbuilders - A design example that exposes
ToolCallbacks as@Beans and manages tool names as constants - Examples that pass default tools and request tools to
ChatModel, and how the options get replaced - How to register tools as
ToolCallbackbeans so they can be resolved by name, and how to configure a customToolCallbackResolver - Parallel tool calling options such as OpenAI's
parallel_tool_callsand Anthropic'sdisableParallelToolUse - Example code for a user-controlled loop combined with
ChatMemory, and for advisor-controlled execution with the memory advisor placed inside the loop
References
- Tool Calling: the Spring AI reference documentation for tool calling
- Ahead of Time Optimizations: Spring Framework documentation on native image builds and reflection hints